





Today I'm giving you a look at one of my latest big projects. I'm calling it DIY dining. Most of what you see here was made or altered by me.
WARNING: this is a very picture heavy post.

Here's a good look at the table I built by adjusting the plans for this narrow farmhouse table to make it a little wider and added some trim around the edges to make the top look chunkier. L.O.V.E. it!! It seats up to 10 if we add a chair on each end.

Another look at the end of the table you can also see the bench I made to match. There was no plan for a bench to match the table so I had to make that up, but I was really pleased with how it turned out. I'm working on some matching chairs, just ran out of time before Thanksgiving.

Here's a look at the bench.


I've got to find the before picture I took of these candle holders. They were this ugly, shiny, old looking gold. I picked them up for 50 cents each at my local goodwill. Add some spray primer and black patina spray paint and voila, pretty matching candle holders.

This was the first year we hosted Thanksgiving at our house for the whole family (both mine and my husbands) and I wanted to make a good impression. We bought some pretty white plates from Wal-Mart as well as some red cloth napkins.

I found some napkin rings 2/$1 at Michaels, they had leaves and turkeys on them. Those wouldn't work, so you know I had to decorate the napkin rings.

and a close-up of the napkin ring. I used a bunch of my Papertrey Ink supplies: a leaf prints die on simply charteuse felt, a pure poppy button with silk ribbon, a limitless layers die, the sentiment from 2009 autumn tags. As well as some Martha Stewart chunky glitter and practicing creativity's houndstooth background from retro christmas backgrounds

One last look at the whole ensemble.

I love my dining room, and hope you like it too. Thanks so much for stopping by!
The table is 37 1/2" wide and 8 feet long, I basically just added an additional 1x8 to Ana's plans.
The trim I used around the edges is from my local Lowes.
It looks like this, only for my table I flipped it upside down so the chunkier part is at the top.
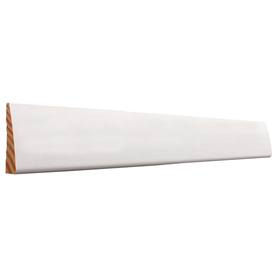
It's EverTrue Pine Modern Casing.
The high gloss finish ends at the edges of the table, it's self leveling so I was afraid it would just drip off the edges if I tried. It's a polymer compound that starts in two different bottles and you mix them together and pour it on. Then you smooth it out and it self-levels. The brand I used is EnviroTex Lite, I found it at Menards but I'm sure you could find something similar at any home improvement store.
I used a gel stain by Varathane called Early American and two coats of wipe on high gloss polyurethane on the rest of the table and bench (not the top).



 Posts
Posts

